Pumping Basics
New to pumping? Learn the basics of pumping breast milk—from choosing the right pump and flange fit, to building a schedule that protects your supply and fits your life.
Key Points
Milk removal drives milk production
Whether you’re nursing or pumping, regularly removing milk tells your body to keep making more. If baby misses a feed or if milk isn’t transferring well, pumping helps protect your supply.
Comfort matters more than intensity
Pumping should not hurt. Pain can reduce milk flow and make pumping harder to sustain. Proper fit, appropriate suction levels, and a relaxed environment make a big difference.
Consistency beats perfection
You don’t need a “perfect” pumping schedule—just a realistic one. Pump when baby would normally feed or anytime you’re feeling overly full to maintain comfort and supply.
Pumping can feel overwhelming at first—but it doesn’t have to be. Whether you’re building a small stash, heading back to work, or exclusively pumping, the basics come down to one core idea: regular, comfortable milk removal supports milk production. With the right tools, a bit of practice, and a plan that fits your life, pumping can become a manageable (and even empowering) part of feeding your baby.
Types of Breast Pumps
Hand Expression
Best for: Early postpartum (colostrum), quick relief, times without a pump, building foundational skills
Pros | Cons |
|---|---|
Especially effective in the early days after birth (when milk volume is low and thicker) | Can take practice to learn how to hand express breast milk |
May support longer-term breastfeeding success when used early (compared to early pumping in some research) | May be less efficient than a pump for full milk removal later on |
No equipment needed—free, always accessible, and helpful back-up in any situation | Requires hands-on effort and time |
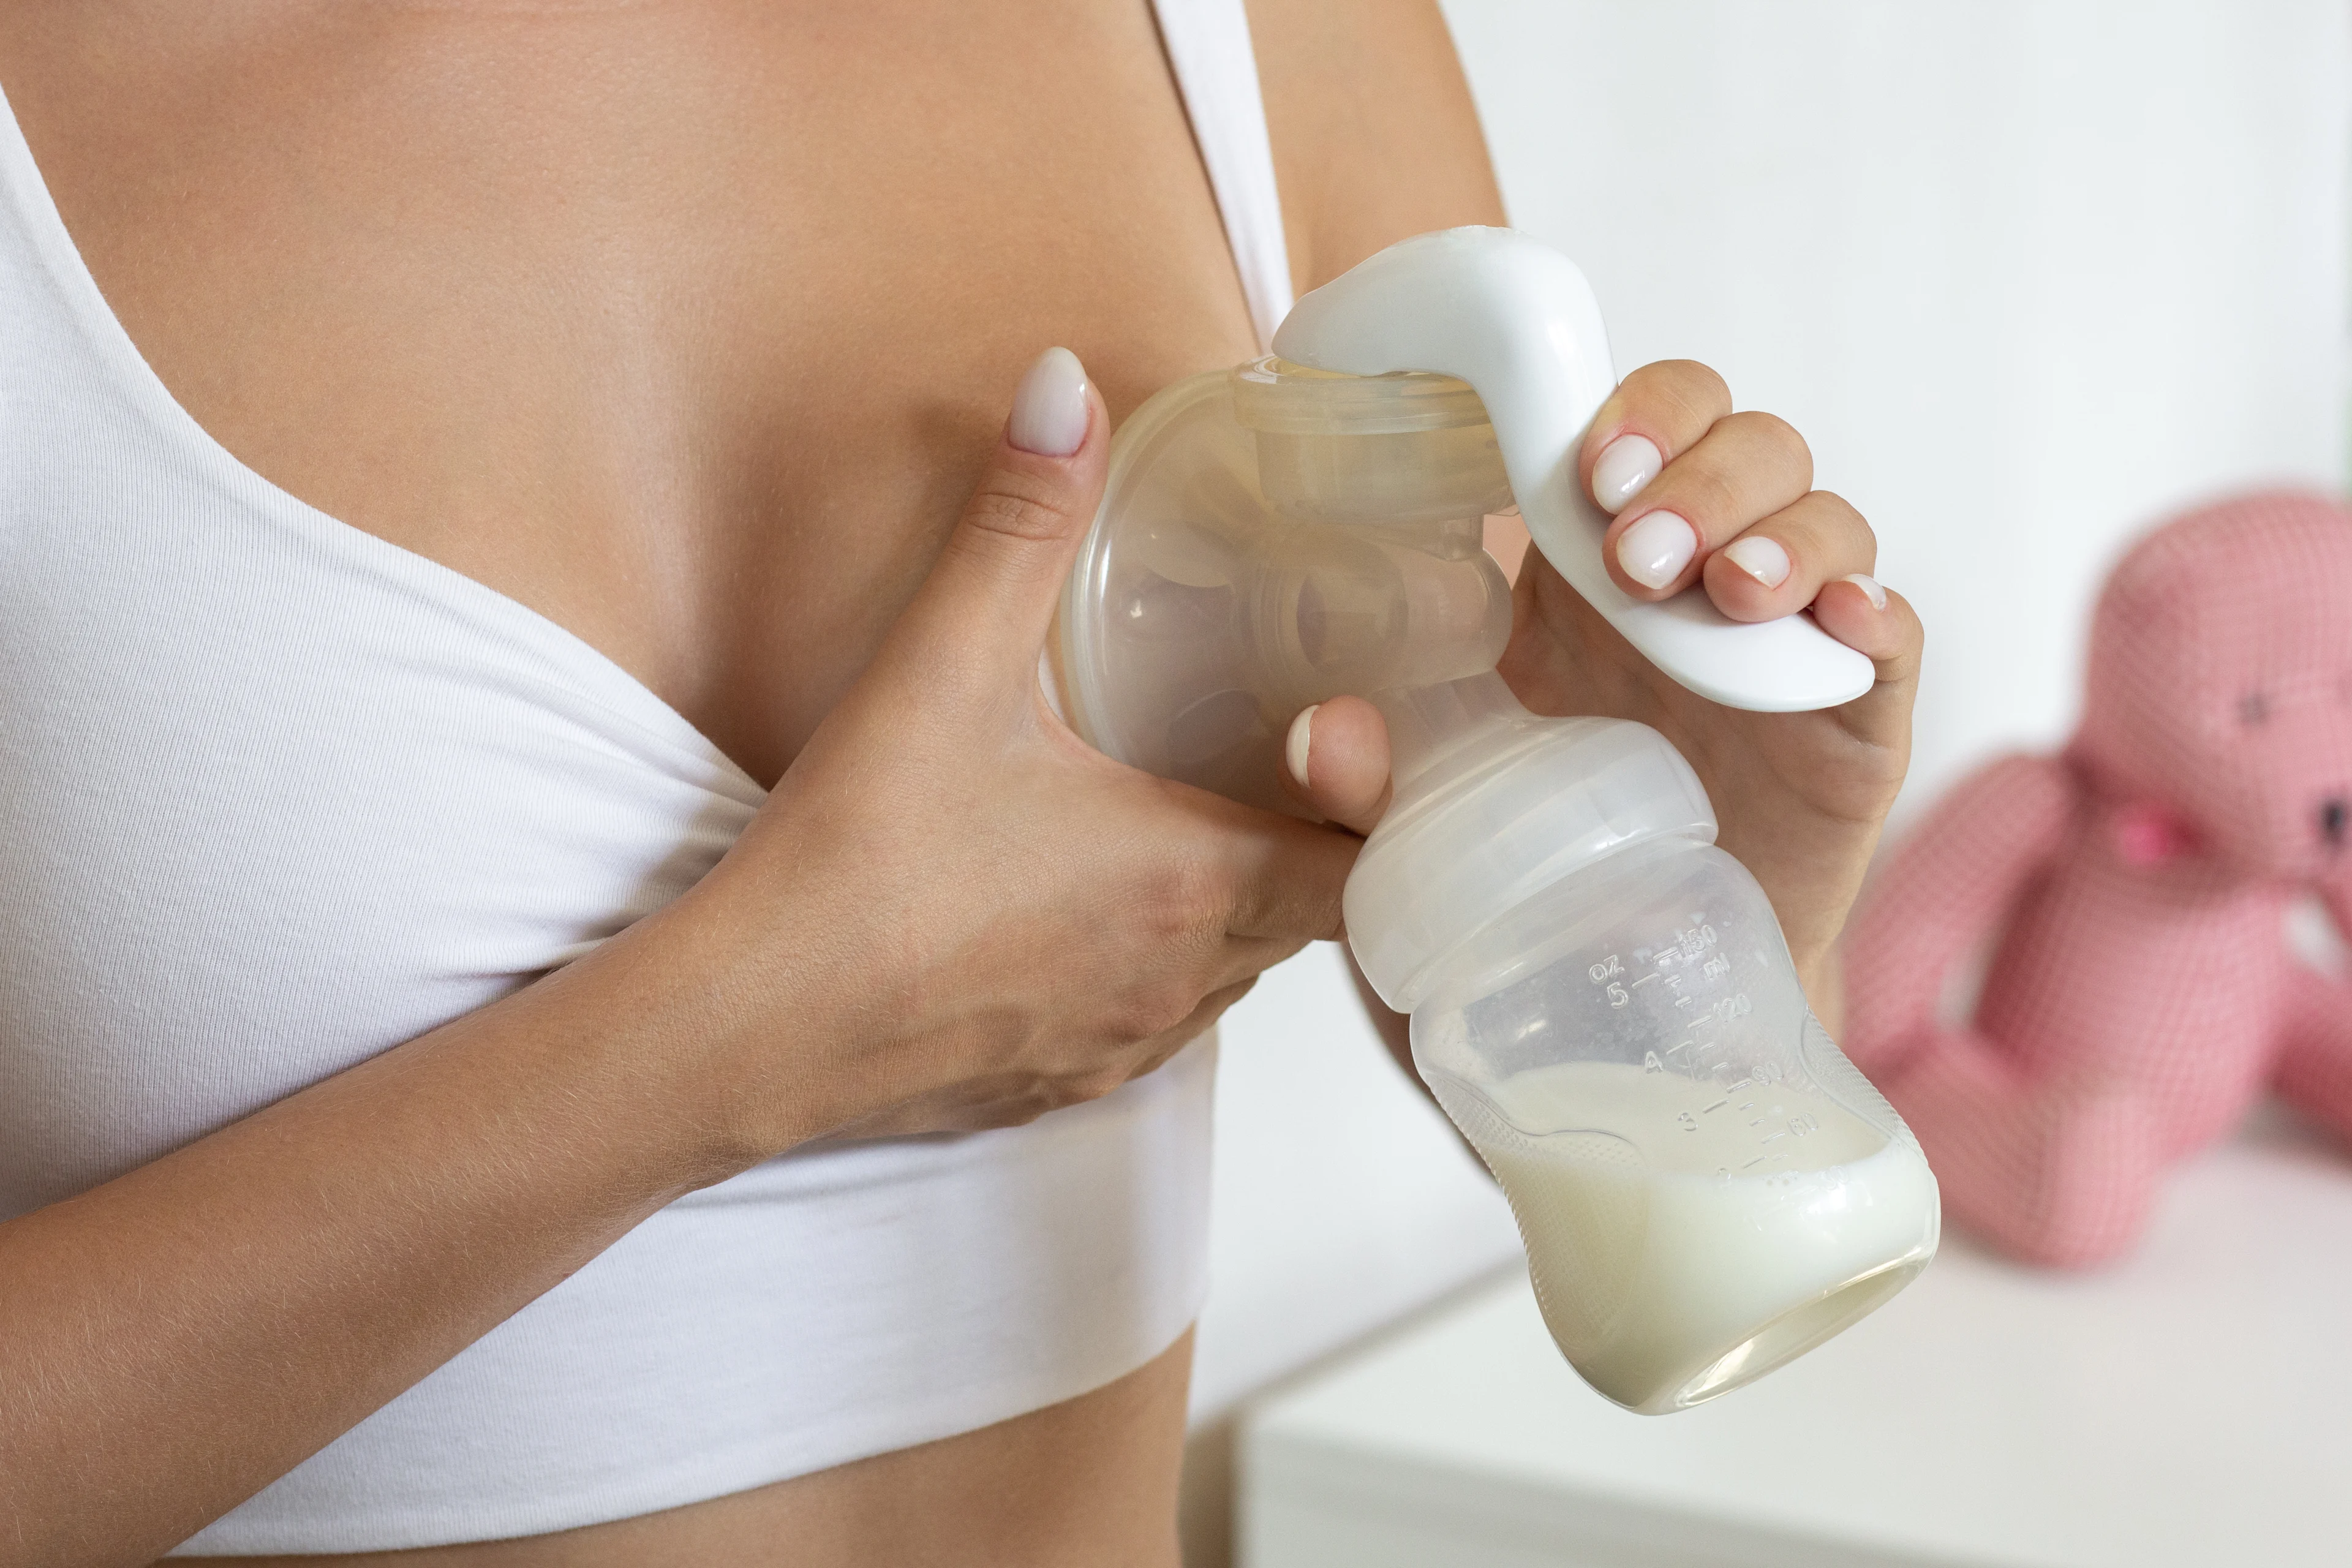
Manual Hand Pump
Best for: Occasional pumping, travel, quick relief, simple needs
Pros | Cons |
|---|---|
Portable and lightweight | Requires hand and wrist effort |
More affordable than electric pumps | Typically slower than electric pumps |
No electricity or charging required | Less ideal for frequent or exclusive pumping |
Some can be used hands-free when seated | Hands-free models may detach when you’re moving around |
Examples include the Haakaa and the Medela Harmony. Manual hand pumps are also a great option if wanting to collect breast milk on one side while baby is feeding on the other side. Baby sucking can trigger the letdown in both breasts, allowing the manual pump to collect milk on the other side. They are also a great resource when you need to maintain an increased supply, such as when you are feeding multiples.
Electric Pump (Single or Double)
Best for: Regular pumping, maintaining or building supply, exclusive pumping
Pros | Cons |
|---|---|
Most efficient option for frequent use | More expensive |
Double pumping saves time and may better support milk production | Requires power source or charging |
Adjustable settings for comfort and effectiveness | Tends to require more set up and clean up than hand expression or manual pumping. |
Wearable options are helpful for pumping on the go in a wide variety of settings. | Some wearable models can be tricky to position correctly and may shift when you move. |
This category includes hospital grade electric breast pumps, portable electric breast pumps, and wearable-portable electric breast pumps.
Hospital grade pumps tend to have the strongest suction so people who are exclusively pumping might benefit from renting one. They also have a “closed” system allowing one pump to be shared with others. Some examples include: the Medela Symphony, the Spectra S1 and S2, and the Ameda Pearl.
Portable electric pumps may be slightly less powerful than hospital grade electric pumps but they tend to be sufficient for most parents who pump in addition to breastfeeding. They are also easier to pack and bring with you than a hospital grade pump so they work well for a return to work situation. Some examples include: The Ameda Mya Joy, Lansinoh Natural Wave, and Medela Pump in Style.
Wearable-portable electric breast pumps are excellent for moms on the go and who need to pump hands free. These are practical and tend to be discreet, often making less overall noise than other electric pumps. Some parents prefer to use these in addition to a higher powered double electric pump. Some examples include: The Elvie, the Momcozy M5, the Willow Go, and the Eufy S1 Pro.
When to Start Pumping
When to start pumping depends on your circumstances and goals.
When baby is unable to nurse or you want to pump exclusively
Start pumping as soon as possible—ideally within a few hours of giving birth or within a few hours of their last attempt at the breast. Hand expression can be a good option when a manual or electric pump is not available (ideally with lactation support).[1]
When you are away from baby or you want to practice bottle feeding
Consistently removing milk from your breasts tells the body to keep making breast milk, so use a pumping schedule that mirrors baby’s regular feeding times. Regularly pumping can also help avoid breast engorgement and clogged milk ducts, which tend to happen when you go too long between nursing or pumping.
If baby is not gaining weight or your supply is determined to be low
Add one or more pumping sessions into your daily routine as soon as you realize there is an issue. Support from a lactation consultant can be particularly helpful in this scenario. For example, they may advise you to pump after each feed if baby isn’t latching well to the breast and is therefore not obtaining the amount of breast milk needed for growth. This can often be referred to as “triple feeding” with baby latching to nurse for a limited time, pumping, and then feeding the pumped milk via bottle to baby at each feed. Alternatively, they may suggest adding just one additional pumping session to increase your milk supply. Individualized support is important.
If you are preparing to go back to work or travel away from baby
Start pumping before the separation (at least a few weeks before you’ll be away from baby) so you can practice. You can start with a short pumping session (3 to 5 minutes) to get used to it, then increase the length of the session over time.
In our experience, pumping once or twice a week in the months leading up to a return to work helps build a small but significant “freezer stash” of stored breast milk. This can ease anxiety about transition back to work, and it can be helpful if you experience a temporary milk supply dip in the first weeks back at work. Check out how to safely store and reheat breast milk for guidance.
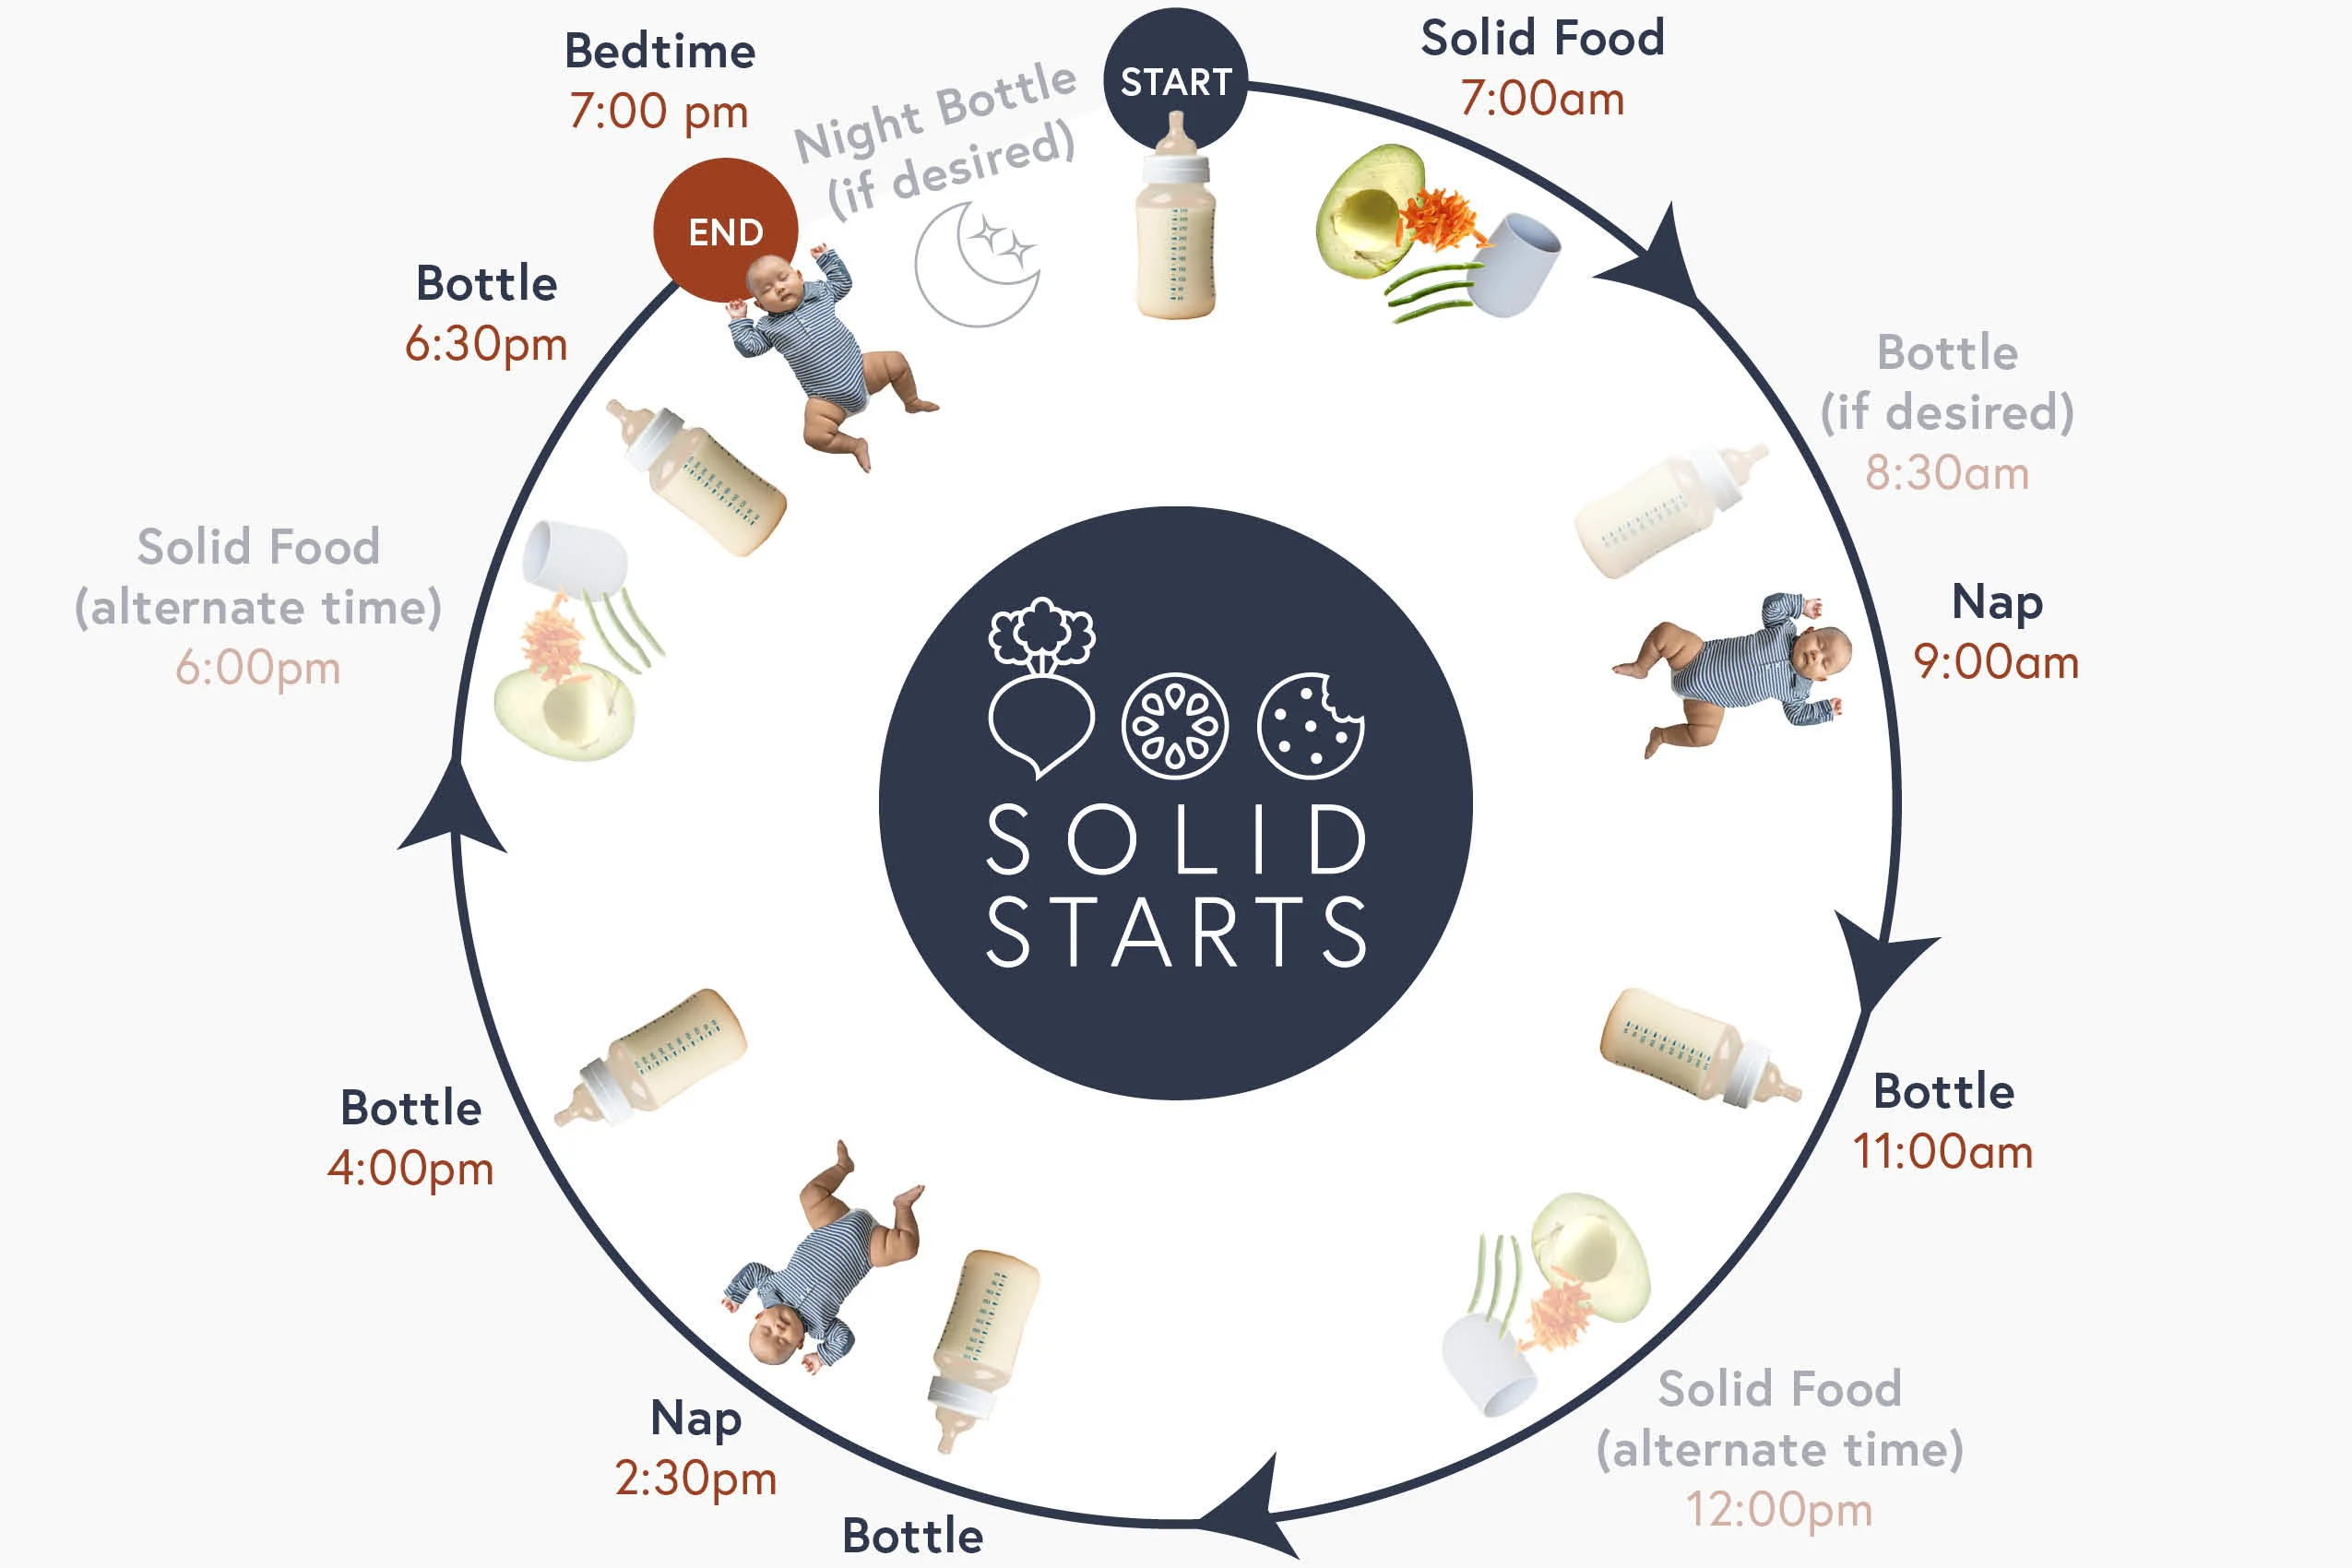
How Long and How Often to Pump
Try to match your pumping schedule to baby's feeding pattern, which changes as they grow. For many families, this looks like pumping every couple of hours, especially in the early weeks and months. Check out pumping schedules for detailed guidance.
Pumping Equipment
Sometimes all it takes to increase your milk supply is to get a better-fitting flange. A poorly fitting flange can cause nipple pain and damage—too small or too large can lead to rubbing and soreness. Most pumps come with a standard “medium size” 24mm flange, though flanges can range from 13mm to 36mm depending on brand.
Signs your flange fit may be off:
Nipple rubbing the tunnel walls
Areola pulled deeply into the tunnel
Blanching, swelling, cracking, or persistent pain
Reduced output despite strong supply efforts
Try this:
Re-measure (nipples can change size over your nursing journey)
Center the nipple in the flange tunnel
Lower suction—stronger isn’t always better
Consider “hands-on pumping” (gentle compressions) to improve removal
Consider a passive milk collection device such as a Haakaa
Consider lubrication
How to Measure Your Nipples for Correct Flange Size
Getting the right fit starts with a simple measurement. Using a ruler or soft measuring tape, measure the diameter of your nipple at the base (not the areola) in millimeters. From there, most find that adding 2 to 4 mm to that measurement gives the most comfortable and effective flange size. Keep in mind that your left and right nipples may differ, so it's worth measuring both.
A well-fitting flange allows the nipple to move gently and freely within the tunnel during pumping, without pain, color change, or swelling. When in doubt, a lactation consultant can assess your fit in person and help you find the size that works best for your body.
Creating a Pumping Station at Home
Set yourself up for success with a dedicated space:
Pump and parts
Clean bottles or milk bags
Water and snacks
Phone charger or entertainment
Burp cloths or towels
Why it helps: Reduces stress and makes pumping easier to stick with.
How to Clean Breast Pump Parts
After each use
Right after pumping, take apart the pump kit, then use warm, soapy water to wash the pump parts that touched breast milk. Rinse with warm water, then let air dry on a clean surface. Store the clean parts in a sealed container.
Refrigerating pump parts between pumping sessions may be an option in some cases, but proper cleaning is the gold standard for safety.
Once a day (or as needed)
It’s a good idea to sanitize pump parts once a day for safety. This is especially important for newborns under 2 months old, premature babies, and babies with a weakened immune system. You can sanitize pump parts by boiling or steaming them in water. Some dishwashers can also be used to sterilize pump parts as long as they are dishwasher-safe and not packed into the washer with cooking equipment and tableware that is heavily soiled.
Examples of Popular Pumps
There are many high-quality pumps available today, and the “best” one depends on your needs, lifestyle, and how often you plan to pump. Many families use more than one type of pump. Comfort, fit, and consistency matter more than the specific brand—what works best is a pump that fits your body and your routine.
Hospital-Grade / Multi-User Pumps
These are powerful, highly effective pumps often used in hospitals, and they can be especially helpful in the early postpartum period or for medical needs. Because these pumps are quite pricey, they are typically rented rather than purchased.
Examples: Medela Symphony, Ameda Platinum
Best for: Establishing supply, exclusive pumping early on, or when baby is not feeding effectively
Double Electric Pumps
With a strong suction and adjustable settings, these are reliable, efficient, are great for regular use, and many are covered by insurance in the United States. They typically require electricity to operate, though some use rechargeable batteries.
Examples: Spectra S1, Spectra S2, Medela Pump In Style, Motif Luna, Lansinoh Smartpump
Best for: Daily pumping, maintaining supply, returning to work
Hands-Free Pumps
These wearable pumps fit inside your bra with no external tubing, allowing you to move around when pumping. Note that milk output may be lower for some, and they are often more expensive.
Examples: Elvie Pump, Willow Go, Willow 360, Momcozy Wearable Pumps
Best for: Multitasking, pumping on the go, convenience
Portable / Compact Electric Pumps
Lightweight and rechargeable, these pumps can be paired with traditional or wearable-style set-ups, offering a good balance between power and portability.
Examples: Baby Buddha, Pumpables Genie Advanced, Spectra S9
Best for: Parents who want strong suction in a smaller, more portable design
Manual Pumps
Manual pumps are simple, affordable, and easy to use. While they’re not ideal for frequent pumping (so much work!), we love to keep them in our bag for quick pumping sessions on the go.
Examples: Medela Harmony, Lansinoh Manual Pump
Best for: Occasional use, travel, or backup
Frequently Asked Questions
Once pumped, breast milk should be put in the refrigerator within 4 hours, or stored in an insulated container (like a thermos or an insulated lunchbox with an ice pack) for up to 24 hours. Once breast milk is in the refrigerator, it should be used within 4 days or put in the freezer for 6 to 12 months. Learn more safety tips for storing breast milk.
Breast milk can sit out at room temperature once pumped for about 4 hours before it should be put in the refrigerator. That said, if you start feeding and there are leftovers, the remaining milk should be used within 2 hours as oral bacteria can get into the milk and grow over time. Learn more safety tips for storing breast milk.
Every body is different and the amount of milk you are able to pump will depend on several factors, including how much of a supply you have built and how much milk your breasts are able to store at any given time. Some find that they are able to pump several ounces of milk per pump session if they are exclusively breastfeeding, while others pump smaller amounts and must pump more frequently to keep up with baby’s needs.
Generally speaking, most exclusively breast- or bottle-fed babies who have not started solids need between 24 to 32 fl oz (710 to 940 mL) per day of breast milk or formula. If you are exclusively pumping, you will need to pump around that much to keep up with baby’s needs, so if you are pumping 8 times per day, you should get at least 3 to 4 fl oz (90 to 120 mL) per pump session. Some parents can pump much more than this. Others may need to pump 10 to 12 times per day to get this amount. Learn more about how to increase your milk supply.
How often you pump will depend on your pumping goals and your circumstances. Generally speaking, pump whenever baby would normally feed but is unable to go directly to the breast—typically every 2–3 hours for younger babies. Adjust based on your goals and supply. Check out pumping schedules for detailed guidance.
Typically no. Only if baby isn’t transferring milk well, if you’re trying to increase supply, or if you’re trying to build a stash of milk. Learn more about how to increase your milk supply.
Yes. Pumps are not as efficient as babies. Output can vary widely and doesn’t always reflect your true supply.
Plan your pumping schedule around your workday (typically every 3 hours) and start practicing pumping ahead of time. We find that pumping once or twice a week in the months leading up to a return to work helps build a small but significant “freezer stash” of stored breast milk. Many families experience temporary dips in their milk supply when returning to work; this is common and often resolves with consistency. Check out pumping schedules for more guidance.